September 28, 2011

Cookies and Cream Cake, SAY WHAT?!

This is by far the best cake I have ever made!  I found it on Annie's Eats.  I love her blog, it is one of my main go to blogs for recipes.  The other of course being Pioneer Woman.  They can do no wrong!

I just followed Annie's directions step by step and ending up with the best tasting cookies and cream cake I've had in my life, and a very happy husband!


Sorry for the ugly cake platter dealio.  I had to use the one for transporting because we had his birthday dinner at my mom's casa.

September 23, 2011

Bird Watching

It's been a while since I've done some painting on canvas so I figured it was high time to give it a go again.  This is my last small canvas that came in the 3 pack at Ross (totally random).  I wasn't quite sure what to paint on it but then I remembered the last time the Hubs and I were in a Rug Store there was a pillow that had this cute bird design on it (also totally random).  I knew I wouldn't remember it exactly so I whipped out my phone and snapped a pic of it.  That was months ago.  I'm so glad I used my noggin about it though because it took me no time at all to whip up this little diddy.

I used some of my blue water colors to paint the background.  Then I went back after they dried and did the whole bird and branches deal. 

For some reason it looks green here but I promise it's blue
Once again, Hubs scored points because when he came home from work he commented on how much he liked it!  We don't have much blue in our house though so off to the booth it goes.

September 21, 2011

Lampshade

This was my first ever lampshade makeover project.  I found the lamp at the estate sale I went to back in the spring and it has been sitting in my garage ever since.  I bought some fabric from my local fabric store and was ready to get to work.  The shade that came with it sucked.  Don't get me wrong, it's a great lamp shade as far as shading the lamp but when it came time to put the fabric on it, it sucked (no other words to describe it). 


I felt like doing this about part way through the project.  I don't know why it stressed me out so much!


I used some spray adhesive and sprayed it on the shade and then I smoothed the fabric over it.  I did it just a section at a time to make sure the adhesive wouldn't dry before I got to it.   

While the adhesive was drying I taped off around the bottom of the actual lamp (not the shade) to spray paint the base.  It was originally gold, I painted it black, didn't like that, painted it silver, didn't like that, and then finally went with a champagne color (close to gold but not so bold) which I thought really accented the fabric.  Whew, I'm not picky or indecisive at all (poor hubby)!

I was so glad to have the project finished and my first lamp redo done!  I don't really have a place for it in my house so it's in the booth just waiting for the right person to take it home!


September 19, 2011

Creative Bloggers' Party & Hop

SJ from Homemaker on a Dime so kindly let me know about her "Creative Bloggers' Party & Hop".  Just link up your latest and greatest to show people what you're made of!  I sure am!


Furniture for Grandma Doris

We have these friends that we claim as family.  We usually go on vacation with them every summer and have a blast.  Their grandma's name is Doris and she is a riot.  They got wind that I'm into furniture and she asked me to redo this ooooollllllddddd piece that she had.  It's an end table that was her mother's.  It had an awful ring on the top of it where someone had over watered a plant a few too many times.  Her only request is that it be stained Mahogony to make it look like it used too. 

*please use your imagination on what the table looked like before...forgot to take a pic*

After a couple hours (yes hours) of sanding I wiped it down and then applied a wood conditioner.  I was going to use some polystain I had already but wouldn't you know it that when I opened the can it had congealed.  Darn the bad luck.  Off to Home Depot I went.  It took 2 coats everywhere but 3 coats on the top and middle section. 


Hopefully this is what Grandma Doris was looking for!

September 16, 2011

We're Gonna be Famous!

Not really but that's what I felt like when I went up to the booth yesterday.  I was just minding my own beeswax going to drop off some loot in the booth when I walked up and there was a full blown photo shoot going on.  My heart stopped for a second.  I was a little star struck because while I know Mrs. DeVore's stuff is pretty freaking amazing, mine just sometimes borderlines on amazing.  I kindly asked if I could put my stuff in the booth and they were super nice about it.  I tried to hurry up but I felt like they were watching my every move.  All I could think was, please don't trip, please don't flash your bum on accident (I was wearing a dress), just act cool. 

Turns out they were from a yarn company that distributes to places like Michaels.  They were using our booth and our stuff as props and backgrounds for photos of the yarn.  Not just balls of yarn, but like a blanket they made out of their yarn. 

Here they are hard at work.


Many apologies for the crappy iPod photos.  I'm just glad I had it with me to document this craziness!

September 15, 2011

China Cabinet Redone...again.

Remember back when I found this china cabinet at my local Habitat for Humanity ReStore?


I have already grown tired of the way I re-did it the first time and decided it was time for a change.  I had left the inside the original brown wood look.  The items in the cabinet just weren't poping.  It just wasn't working for me. 


So, I woke up from a nap and brought the can of black paint inside, cleared out the cabinet and started painting away.  It took 2 coats because I didn't prime the inside.  I might regret not doing a coat of primer but I think it looks pretty good for now!


All in all, it might not have changed the look too much but now I can take better naps.

Check out my new favorite item in there.  They are light pink glasses.  They were in the booth across from ours and I had been eyeing them all summer.  When I was up at the booth the other day the lady who runs that booth was in there so we started talking and low and behold she gave them to me for half the price!  SCORE!

September 14, 2011

Easy DIY Fall Wreaths

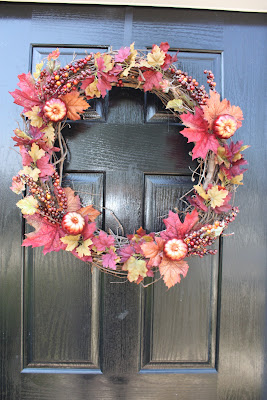
Even though it is not technically fall yet I gave in and decorated for it!  Let's just say when it is officially fall my house will be welcoming it with open arms.  This is the first fall season in our new house so our decoartions are looking a little sparse. 

The first order of business was a fall wreath.  I went online to check the ad for Hobby Lobby and as luck would have it all their fall wreath picks were 50% off!  I made a mad dash there on my lunch break and assembled a wreath for our door.  I ended up going back the next day and bought more stuff to make some wreaths for the booth.  It will be fall there too ya know!

I started with a simple grapevine wreath.  I was in luck because these were not suppsoed to be 50% off but the lady rang them up as floral and took 50% off!  YAY!  Sometimes its great when people make mistakes!


Here are some of my many picks.  These are just the ones for the wreath I am keeping.


After a little hot glue and some floral wire here are the finished products.


My husband made me so proud.  While working on the wreaths I made the comment that our dining room table looked like fall thew up all over it and his response was, "I'm ok with that, I love fall!"  Made me smile :)

Linking up to

The DIY Show Off


September 12, 2011

White is the new Gold...

...probably not but I didn't know what else to title this other than "spray paint some ugly crap to make it look better" but that just didn't have much of a ring to it.

I found these gold items at my local Salvation Army.  I hit them up on my lunch break every now and then (about twice a week to be exact).


A little spray paint always makes things better!

(don't hate me, these were gold too but yours truly forgot to take before photos)


September 01, 2011

Pink Lemonade Cupcakes

I've been dying to make those and I finally had a legit reason to.  My friend Sarah is having a baby girl in October and over the weekend all of us Sunday School gals threw her a shower.  Thus...the baby pink lemonade cupcakes.


The recipe I used for the cupcakes I found here.  I also used her recipe for the icing as well.  I just decided to use 1 color instead of 2.  I also added a little bit of lemon zest to both the cupcake batter and the icing to give it a little extra zing. 


For the garnish I added pink sugar sprinkles and cut up lemon triangles.  I figured I had a whole lemon that was going to go to waste (you know, the lemon that I used a little bit of zest from) so might as well use it up!  I think lemon zest swirly things would be pretty on top too but I don't have a zester (I use a cheese grater) and I'm not that talented.