February 18, 2012

Goodwill Candle Holders

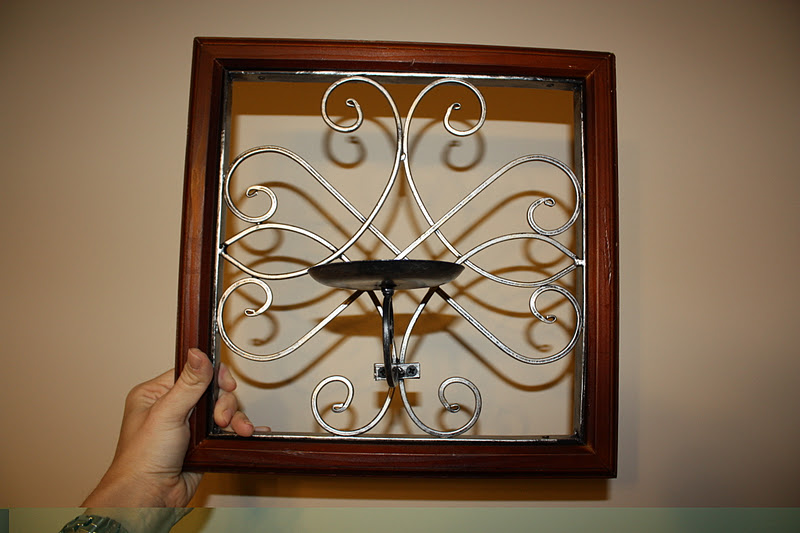
On one of my most recent Goodwill trips I found a set of these wall mount candle holders.  The frame is wood and was pretty beat up.  The picture helps hide all the flaws. 


When I bought them I wasn't sure if they would end up in my house or The Depot.  I used Frog Tape and taped off around the inside edges so I wouldn't get paint on the silver iron parts.  I lightly sprayed on some primer and then used a satin black spray paint on top.  I had to be very careful not to get the overspray on the silver parts though.  It took about 10 minutes for the whole thing, with taping being the worst part.

Oh, looky there.  They found themselves a home in my home! 


We found the round candles at Garden Ridge for $2 a piece!

February 17, 2012

Curtain Rods GALORE!

A few weekends ago Hubs and I met some friends at our favorite breakfast spot and after gorging ourselves eating we decided to head over to Lowes for some scrap wall paper I needed for a project.  While we were wandering aimlessly trying to find the wall paper we stumbled upon a sale rack of curtain rods.  There was a only a few there but then we discovered a sign that led us to aisle 15.  It was like a light from up above was shining down on aisle 15.  It was magnificint.  There at the end of the aisle was all the curtain rods you could ever want.  Even though we didn't exactly budget for that this month we decided that this would be the most cost effective way to finish buying curtain rods for the house.  We are talking $40 and $60 rods for $9 people!!!  Needless to say I never did get my wall paper but we walked outta there with 4 rods, 2 fenials and brackets for around $60!!!

Here is the progress of the rods being hung so far:


Rod for the nursery.


Rod for the bonus room.


Mercury glass rod for in the kitchen.  Please ignore the wall patching...we're workin' on that...
allen + roth 72" Sienna Wood Curtain Rod
Similar to the rod we bought for the living room.  We also bought fenials for the ends, brackets, and rings.  We haven't hung this one yet because we are waiting until we get the curtains to make sure the measurements will be correct.
Now it might be a little while until they have curtains hanging from them but at least this part is finished!

February 16, 2012

Living Room Progressing...SLOWLY

When we saw our house for the first time it was empty.  It had been a foreclosure and someone bought it and flipped it and then we bought it.  Sweet deal, right?  The fact that it was empty made it seem super spacious.  Fast forward to moving day when we put our living room furniture, piano, and ginormous TV in the room.  Amazing how quickly it shrunk.  We have since moved the ginormous TV upstairs and have bought a smaller one to go in the nook over the fire place.  So now we are left with mismatched furniture and a large piano (well, a Christmas tree too).  The room is such an odd shape and I like for rooms to be open and have a smooth flow of traffic so it made finding furniture for this room even more difficult.  We also had to think ahead (since there is a baby on the way) about all the stuff adorable items that come with a baby. 

Before:


We painted the room to make it feel a little more cozy.  The color we chose is made by Behr and is called "Perfect Taupe".  It's a great greige color (greige= gray + beige).  The color of the sectional is called "earth" and is a harvesty color so we wanted to try and even out the tone in the room.  If that makes any sense at all.

We found this sectional as Ashley furniture.  It was under budget but still a little more than what we were wanting to pay for furniture.  We luckily got a Groupon though to help out with the cost.  We've learned the key to bargain shopping for big tickets items is CASH MONEY.  We hope to get an antique chair to refinish to go across the room but for now we are going to hold off on that until we see how much space the little man's stuff actually needs.

Funny story...the before pics have the Christmas decor in them because that is when we bought our new furniture.  Little did we know it wouldn't be February until it arrived.  Good ol' Ashley Furniture lost the other half of our sectional.  Now I've heard of loosing a lucky penny or an earring but a sofa?  Come on now.  That's just crazy talk!  We waited another 2 weeks for it to be deliverd.  Delivery day arrived and I couldn't have been more excited, until they took the plastic off and I noticed the fabric was DAMAGED in one corner.  Totally wouldn't have been a big deal if we purchased off of Craigslist but this was BRAND NEW!  I "REFUSED" the furniture and then we had to wait another 3 WEEKS to get it. 


Where'd we get the rug?  Well I'm glad you asked...it's from BJ's, yeah like the warehouse store...crazy right?!  So soft and cozy.

P.S. The piano...it can be yours for free...we'll help you move it out but after that it's all on you baby!

Media tower was a Salvation Army find.  Big rod in the corner...that's the curtain rod we gotta hang.

The massive nail head trim was a major selling point for me!
The To Do List:
- curtain rods
- paint
- curtains (to make or to buy...that is the question)
- large rug
- wall art
- possible antique chair
- sell pillows and buy/make new ones
-remember....FREE PIANO!

February 15, 2012

The Remains of Valentine's Day

I've been seeing the Valentines mantles all over blogs and Pinterest and figured it would be a free way to add a little Valentine spirit to the living room.
I just found a template for a heart online, printed it, and then cut it out.  Then I took some scrapbook paper I already had and traced the heart and cut those out.  Then I put all the hearts on top of each other and used the hole punch to put a hole on each side.  I wanted to use ribbon but I couldn't find any long enough so I used some thin rope.


Simple.  Easy.  Kind of cute.

I also made the Hubs this Valentine's day card...another shout out to Pinterest...


Do you get it?!

He surprised me with dinner from my favorite noodle place and favorite cupcake place that I don't get to go to anymore since we live 45 minutes away from it.


That would be vanilla bean butter cream on vanilla bean and triple chocolate!  Also known as the way to a 5472124 month pregnant woman's heart!

February 03, 2012

Hanging Ribba Frames...Disaster or Deleight?

I knew I wanted to keep most of the design for the nursery pretty simple.  I didn't want it to be totally themed out but we did want a strong influence of Kenya in the room.  Kenya holds a very special place in Hubs and my hearts since we went on a short term mission trip there over a year ago.  While we were in Kenya we were able to go on a real life African Safari.  I never thought I'd be able to check that one off the bucket list!  Hubs got some AMAZING pictures of the animals and we decided to use some of those in simple IKEA Ribba frames in the room.
RIBBA Frame, white Width: 12 ½ " Height: 16 ½ " Picture, width: 11 ¾ " Picture, height: 15 ¾ " Mat inside meas. W: 7 ½ " Mat inside meas. H: 9 ½ "  Width: 32 cm Height: 42 cm Picture, width: 30 cm Picture, height: 40 cm Mat inside meas. W: 19 cm Mat inside meas. H: 24 cm
We printed the pictures out at Wolf Camera and found free online coupon codes so we ended up not paying a dime!  The Ribba Frames set us back about $40 ($9.99 a piece).  $42 if you want to add in the cinnamon rolls we ate while we were there...

I was putting the photos we printed into the frames and looked at how I was supposed to do assembly for hanging them.  That's when I discovered why a big, matted frame was sold for $9.99.  There were wires and clips and a feeling of getting the things in a straight level line would be impossible.  WRONG-O!  Thanks to blogs, mainly thanks to Kelly at View Along the Way.  She has a jammin' tutorial on how to hang these bad boys. 

You can check it out here.

So once we figured out how to make sure all the frames were hung at the same level we wanted an easy way to space them.  We looked around the room and low and behold we found a tag from a pair of baby shorts that was just right.  Ghetto or Genius?  I'm going to go with genius!  My job was to hold the tag up there while Hubs leveled and made the mark for the hole.


It really did not take very long at all to hang them.  The most time was spent assembling the frames and making sure the photo was in the frame straight.


We have a few more things left to do before the nursery will be completely done.  One of which is hanging a ceiling fan with lights because right now the lighting in this room is awful (can ya tell by the pics...I think so!)

Thanks again Kelly!

View Along the Way

February 02, 2012

Jumping on the Band Wagon

The wall above the changing table was bare
Plain. 
Bleh.


I knew I wanted to bring a large mirror into the nursery to help reflect more light.  Hubs and I searched all over.  On our quest we came to the conclusion that we did not want a rectangle mirror just because most of them looked like what you would put above your bathroom sink.  We wanted to find something with a little more flair and I was really hoping to find something round.  FINALLY  I found the perfect mirror for a decent price at TJ Maxx.  It's official, we've jumped on the sunburst mirror band wagon.  


Could it match the changing table any better?!

January 30, 2012

Guest Bedroom Update

I finally found the perfect quilt for our guest bedroom!  It was in our budget too!  What would we do without Marshals? 


I was also lucky enough to find some nice but inexpensive curtains on our latest IKEA run.  The great part is they provide Stitch Witchery for you to make them the exact length you want them- the bad part is that mean you actually have to pull out the iron.  Thus, the picture is only of the fabric....

Buy them here


TO DO:
- find gray quilt
- paint nightstand white
  finish assembling nightstand
-find lamp
- hang picture frames
- paint walls pale yellow
- move current master bedroom dresser into this room
- make/find yellow accent pillow for bed
- find/make curtains

January 27, 2012

This Little Light of Mine

I thought I was pretty much done with the guest bathroom.  The only thing left on "the list" was to find a new mirror or frame in the existing one.  Then this little lamp showed up at my house thanks to Mrs. DeVore.

She actually gave me 2 of them and one is in our bonus room on a desk my husband and I redid way before we discovered blogs.  The other one got a little makeover with some help from some trusty Silver Leaf Rub N Buff.


Now if only I could figure out what to do with all that extra cord.  Is there a way to shorten it?


January 26, 2012

Old Dresser turned Changing Table

I found this old dresser on Craigslist and the seller just so happened to live down the road from our church.  We stopped by after church and picked it right up!  We had been searching for a dresser that we could turn into a changing table.  We researched the different size changing pads to make sure it would fit and still have room for a lamp and a little basket of other changing essentials.  The goal was to keep the entire project under $50.
  Sold for $20!!!

The original plan was to paint the dresser a fun turquoise blue color but as Hubs and I were sanding we discovered that this piece was completely solid wood.  It's kind of rare that the top would be wood (how much wood would a woodchuck chuck...) because usually when you find lower price pieces the top is MDF or press board.  So we sat there for a minute (or ten) and decided it would be more economical to stain it a similar color to the crib. 

I applied a wood conditioner with a brush and let it dry for about 30 minutes or so.  Then I applied a Polyshade by Minwax with my new Purdy brush.  (Like all that name dropping?)


The key is to use long strokes so you don't have lines.  I love using Polyshades because then you don't have to go back at the very end and do a coat of polyurethane.  I ended up doing 3 coats total to get it to the color I wanted.


 (like all the junk?  Just keepin' it real)

Then began the hardware saga.  My original plan was to go with something like this:
It was 2 1/2 inches long.  Bought 8 of them, hubs went to put them on, they don't fit.  Then I bought ones like this in 3 inch:
 
Then I went to put those on and guess what, yup, you're right, they didn't fit either!  BLAST!
I remeasured the holes from the previous handles and found out that the space between them was 2 3/4 inches.  I didn't remember seeing that option in the store so to Google I went.  Come to find out a lot of furniture made in the 1960s used that size and they don't really make them anymore.  DOUBLE BLAST!

Back to the drawing board.  I guess the original hardware isn't that bad, kind of looks like it wants to be Greek Key?  Maybe?  If you look really hard?  So I devised a plan involving Rub n Buff. 


I used Silver Leaf and Spanish Copper.  In the past I had only used Silver Leaf but I didn't want it to look soooo silver.

I had never mixed 2 colors of Rub N Buff together before so I followed this tutorial.  For some reason the RNB got clumpy and didn't dry correctly.  Maybe it's due to the metal I was applying it to or maybe it was operator error?  So I used the Deglosser and removed all of it and then just mixed the 2 colors of RNB together and applied it by hand (with a glove on of course).  After it sat for a few hours I took a rag and buffed it.  This was easier for me and seemed to work quite well.


Ahhhhh (not just saw a shark Ah but rather noise you make after drinking a glass of pink lemonade).  Much better. 


Cost Breakdown:
Dresser- $20
Rub N Buff- $2 (had to buy the copper, already had the silver)
Stain- already had
Wood Conditioner- already had
TOTAL COST: $22