April 25, 2011

Meet Penny!

I have been a absolutely horrible blogger lately.  Oh well, that's life.  I do have about 13 1/2 projects going on right now.  

Here's the other reason why:


WE GOT A PUPPY!!!  

Her name is Penny.  She is just a mutt pound puppy of some sort.  We are thinking a retreiver shepherd collie mix.  Who really knows though.  Funny story though...I was out thrifting when I decided to stop at the vets office and found her there.  
Best thrifting trip ever!
She is 11 lbs right now....taking guesses for what she'll top out at.  So far she knows how to sit and go for a walk correctly.  We are working on stay and down next. 

April 18, 2011

Master Debacle

The very first room I wanted to paint in the new house was the master bedroom.  Our comforter has a dark brown damask design on top of a shiny pale stormy blue so I wanted to do the walls in a similar color family.  The color I choose was "Skylight View" from Lowes.  I didn't want to use paint from Lowes (I've heard Behr is better) so I had Home Depot match it. 

I was so excited the day I bought it.  To me, this officially meant that I was a home owner now.  My husband wanted to help me paint so we waited until that weekend when both of us would be home.  The day was finally upon us, I was bursting with excitement.

Until the paint went on the walls.
Holy baby boy nursery blue Batman!!!

I kept telling myself it would dry a different color.  We got an entire wall and half of another one fully painted.  It was awful.  I had a breakdown.  I cried.  My husband questioned my ability to pick out a color.  It was awful.

Back to Home Depot we went.  We went to the paint counter begging someone to please help us.  This was our last hope, or so we thought.  The burnt out artist hippie guy mixed and mixed and mixed.  Finally we were getting somewhere.  He said this was as good as it gets.  We said thanks, went home and started again.  To our surprise it was hardly different at all.

To the garage we went.  We poured some of my black paint into it to get more the the stormy blue gray we were looking for.  Back to the bedroom (which is the name of a great Janet Evanovich book...go check it out)

Tooooo dark.

Back to the garage.  Added some white paint.  Still not right.  

 (ARE YOU KIDDING ME?!?!?!)

So my husband had the brilliant idea to just pour the color we have now to the rest of the white paint instead of adding so much white paint (this probably makes no sense whatsoever typed out).  THIS was our LAST hope.  At this point in the process I'm pretty sure my husband was rethinking me.


In the process of opening the big jug of white paint we had a little accident.

Paint on the face.  At least we got a little laugh out of it.  We needed that.

FINALLY!  I think This is the color we have been looking for.  


Stay tuned for the final reveal.

April 12, 2011

Yeah I Did

Here is just a sneak peek.  I found this headboard at Goodwill for $20.  They didn't think it would fit in my car....I love proving people wrong.

I squeezed my bum underneth the leg of the headboard and off I went!


Hehe...it won't fit....whatever


Note to self:  Full size headboards don't fit well in my car...but they do fit!!!

April 11, 2011

Cookies N Cream Cupcakes

Oh yes it's ladies night
And the feeling's right
Oh yes it's ladies night
Oh what a night
Once a month we have a "Ladies Night" and this month it was my turn to host.  We did potato bar for dinner with fresh veggies and some dips.  My favorite was dessert though (surprise surprise).  I made COOKIES N CREAM CUPCAKES from scratch. Yum.
 
P.S. This is the tray I just bought at IKEA for $1.99


Makes: 24 cupcakes
Ingredients:
For the cupcakes:
24 Oreo halves, with cream filling attached
2¼ cups all-purpose flour
1 tsp. baking powder
½ tsp. salt
8 tbsp. unsalted butter, at room temperature
1 2/3 cup sugar
3 large egg whites, at room temperature
2 tsp. vanilla extract
1 cup milk
20 Oreo cookies, coarsely chopped (I break them up with my hands)

Frosting:
8 oz. cream cheese, at room temperature
6 tbsp. unsalted butter, at room temperature
1 tbsp. vanilla extract
4 cups confectioners’ sugar, sifted
2 tbsp. heavy cream
For garnish:
Oreo cookie crumbs
24 Oreo cookie halves

Directions:
Preheat the oven to 350˚ F.  Line the wells of two cupcake pans with 24 paper liners.  Place an Oreo halve in the bottom of each liner, cream side up.  

In a medium bowl, combine the flour, baking powder and salt; stir together with a fork to blend and set aside.  In the bowl of an electric mixer, combine the butter and sugar and beat together on medium-high speed until light and fluffy, about 2 minutes.  Blend in the egg whites one at a time, beating well after each addition.  Blend in the vanilla extract.  With the mixer on low speed, beat in half of the dry ingredients just until incorporated.  Add the milk and beat just until combined, then mix in the remaining dry ingredients.  Gently fold in the chopped Oreos with a rubber spatula until evenly incorporated, being careful not to over-mix.

Evenly divide the batter between the prepared cupcake liners.  Bake for 18-20 minutes, rotating the pans halfway through baking, until a toothpick inserted in the center comes out clean.  Allow to cool in the pans 5-10 minutes, then transfer to a wire rack to cool completely.

To make the frosting, combine the cream cheese and butter in the bowl of an electric mixer and beat on medium-high speed until smooth, about 1 minute.  Blend in the vanilla extract.  Beat in the confectioners’ sugar until incorporated and smooth, 1-2 minutes.  Add the heavy cream to the bowl and beat on medium-low speed just until incorporated, then increase the speed to medium-high and whip for 4 minutes until light and fluffy, scraping down the sides of the bowl as needed.

Frost the cooled cupcakes as desired.  Sprinkle with Oreo crumbs and garnish with Oreo halves.

I found this recipe here

April 10, 2011

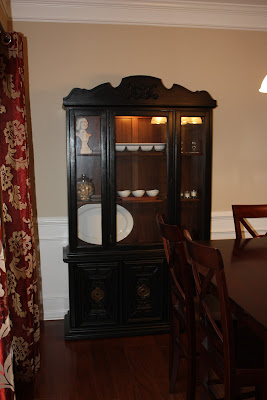
Restore China Cabinet

Back when Mrs. DeVore and I went thrifting about a month ago we stumbled upon this china cabinet at our local Habitat ReStore.  It was already a low price and then it had my favorite sticker ever on it...50% off.  
Love. 

So once again, you would never guess... the ornate detailing in the bottom is...drum roll please...PLASTIC!  


This time I was kind of bummed out by this because I wanted to sand and stain it really dark to match my dining room furniture.  Oh well, I guess I need a little spice in my life.  So I decided on keeping with the dark theme and chose black.  Real spicy, huh. 

I sanded everything I could and then taped it all off and put paper grocery bags over the glass.
Primed it and then started the painting.  I used a satin black but I wanted it to be shiney-er than that so I bought a clear gloss enamel.  Bad decision.  It did nothing but leave brush streaks and thick clumps.  I had to re-sand and prime and then some of the paint started peeling off. AH!  At this point I was ready to call it quits.  The only thing that kept me going was all the crap on the dining room table that was supposed to be IN the china cabinet.

I left the inside the orginal wood look.  My theory is that it would help tie in the wood that is already in the dining room.


Sorry for the lack of "stuff" in there.  Mozart is there though.  Found him at a yard sale for $1!

April 09, 2011

New Love

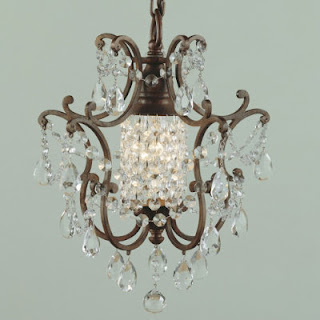
I must confess.  I am in love...with chandeliers.  Even though the house we bought has all new light fixtures I already want to replace them all.  Call me crazy.  I know I really want to put one above the master bath tub.  How romantic.  Here are some that I am really digging right now:

Pottery Barn


I think the one pictures above would be a sweet one for over the tub.  Although the one below would be amazing too.

Ballards
CSN Stores
 Love this one for the dining room.  
 
CSN Stores
Soooo pretty!


April 08, 2011

IKEA

After work today I took myself on a little field trip to Ikea.  I usually hate that store because it is so big and so overwhelming.  Not to mention most of the stuff seems/looks cheap.  I was surprised though.  There were a bunch of items there I found myself adding to my wish list.

Here is my Ikea wish list:

Molnig Chandelier $39.99- I would be hanging this above my lovely (well it's not so lovely right now...but it will be...geesh) garden tub in the master bath.


This adorable little pot.  $3.99.  I want to get some ivy to put in it and put it on the kitchen counter.
There were a lot more things that I liked but I can't seem to find them on the website...go figure.

What I bought:
Cutlery tray for the silverware.  In the new house our drawers seem to be on the small side and so far this is the only thing that fits. $5.99

Storage bin for spaghetti! I bought 2 though.  I mean, they were only $4.99, who wouldn't?

I also bought a pack of paint brushes and a pretty pink tray.  The tray was supposed to be for my husband for him to put his grill items on so he won't take the nice plates outside.  He was not thrilled with the color.  Oh well.

April 07, 2011

Homemade Caramel Popcorn

Every Tuesday evening all the ladies from my Sunday School class come over for Bible Study.  We meet at 6:30 so a lot of the ladies are coming straight from work so I always try and have a little snack ready for them.  I'm always trying to think of something yummy yet inexpensive to make so I stumbled upon a recipe for Caramel Popcorn.  I already had everything needed to make it.  

Here is what you need:

1 bag of popcorn
1 cup packed brown sugar
1/2 cup light corn syrup
1/2 cup butter
1/2 tsp salt
1/2 tsp vanilla
1/2 tsp baking soda

What to do:
1.  Pop the popcorn. Separate the popped kernels from any of the unpopped kernels. You don't want anybody breaking a tooth. 

2. Prepare an area to receive the hot coated popcorn.  Layout wax paper on a cookie sheet and spray with cooking spray to prevent the caramel corn from sticking.

3. In medium sauce pan combine brown sugar, corn syrup, butter, and salt. Bring to a boil over medium heat stirring constantly. Stop stirring. Boil for (4) minutes. Remove from heat, stir in baking soda and vanilla. It will become bubblely. Stir until the baking soda is completely dissolved.
4. Pour over popcorn.  Stir thoroughly to completely coat the popcorn. Pour the caramel onto the wax paper where you already have your popcorn spread out.  Allow to cool...although I couldn't wait and it was really yummy while it was still warm.


April 06, 2011

Fabric

I found this on the thrifting/yardsale/fun day.  It is normally $25 yard and I got a yard and a half for $6!  I am so glad Mrs. DeVore talked me into it.  I almost passed up this great deal.  I am going to use this fabric for the cushions on the kitchen table chairs.


I also found this great rug for my back door.


April 05, 2011

DIY Chest of Drawers

Here is the chest of drawers I showed you in the craigslist post.  

I removed all the handles and took the drawers out.  I then sanded the whole thing.  There were some parts that were the "pressed board" type stuff (I don't really know the technical name) so I just roughed those up a little bit.  I then primed it and let it dry for about an hour...just to be sure.  Then I painted it with your typical black paint.  I used a satin finish.  It is actually from the same gallon I bought for the tableI bought all new hardware at Lowe's and I'm kind of partial, but I really think it makes the piece.


The little white pineapple on top was quite a deal.  It was FREE!  I forgot to take a before picture so you are just getting the after (sowwy).  Mrs. DeVore and I had the ultimate thrifting/yardsale/fun day.  It was a "great success" (said in a Borat voice).  We showed up to one of the yard sales late and apparently the neighborhood was going to have a donation service come and pick up the stuff that didn't sell so they put it at the end of the driveways.  I know what you're thinking....and yes we did it.  We dug through the bags at the end of the driveways.  I got a Tupperware 9x14 cake container for free, a basket, and the cute pineapple!  The embarrasing part it the guy that lived at the house came outside while we were snooping through his stuff.  Whoops.

I spray painted the pineapple white to go more with my decor.  It actually has a candle inside but I painted it shut.
 
I also found the book on top at Goodwill for $1.39.  Not only does it make me look studious it goes with the whole red and black thing.

These little guys also live on top of the new piece.  They are succulents called "Hens and Chickens".  Why you ask...well I have no idea.  You'll have to Google that and let me know.  You just break off the leaves and set them on top of dirt and they grow!  It's a pretty amazing thing.  I love the color and well, think they are just darn cute.

Stay tuned for more posts that are related to the best thrifting/yardsale/fun day ever!